Hello there, how’d you like to learn about more on GitHub? So welcome to the part 3 of the GitHub and chill. In this section, I will be talking about,
- Branching
- Commits
- Checkout
- Merge Conflicts
- Re-basing
- Reset
- Clean
Branching allows us to take a project in our own direction without affecting the main code. And the main reason you want to do it is so that you can go and work with code without introducing potentially unstable code to what is called the master branch.
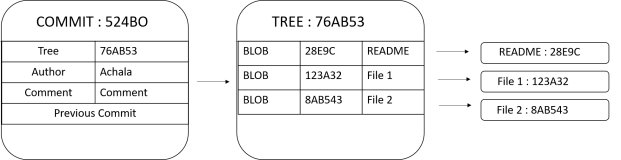
What you see above is what happens each time you commit a project. Each of these files will be given a unique hash code. And a tree object is going to contain those files and the associated hash codes. On top of that a commit object is going to store a reference to the tree and other data such as the author or the commit comments and most importantly a reference to the previous commit and all of that data.
The default branch is called the master. And as you make additional commits the current newest version is going to be referred to as the master commit. And this is where branch comes in. If you create a branch, you can go on a completely different direction with a project without affecting the master until it merges in to the master. Each of these branches is basically just a pointer to a committed version of file and each time you create a branch that doesn’t create a whole new set of files.
You can actually create numerous different branches all on one big giant block of code but however if you are doing this, you have to be very careful because it would be possible if ; let’s say you change the exact same file on one branch as you do on another branch for you to have merge conflicts later on.
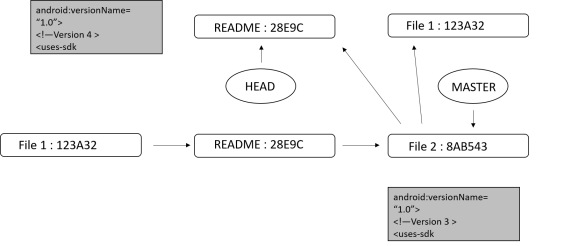
How do I know how to point at the branch that I want to work at or the commit that I want to work with ? – Well basically you are going to use a pointer that is referred to as head as you can see in the above image. This is saying that I want to work with this very specific branch (in this case it’s branch 291D4 ). And you are specifically going to point at the branch or the commit you want to work with by using a command called checkout.
Whensoever you are finished with your branch you can merge it back in to the master commit and then move on. And of cause you are going to be able to make all of these changes either locally or remotely.
So let’s take at a look at how we are going to do all these stuff in the terminal.
First I’m going to show you how to create a branch and how to switch to it.
git checkout -b fix20 -> This is going to create a new branch and switch to it
Now let’s say that I want to go to VIM and make some changes to a file. (We are in the branch right now) type,
vim Hello.xml
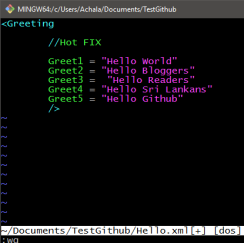
Change to insert mode (type i) and type something (I’m going to add a random comment) then exit out of there. ( Esc + :wq).
Then type,
git commit -a -m ‘Added branch fix 20’
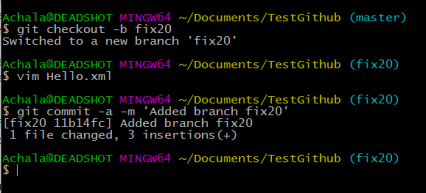
This is going to commit the change but it won’t affect the master in anyway.
Now I can go over to the master,
git checkout master
Now what I will do is push the branch over to Github
git push origin fix20
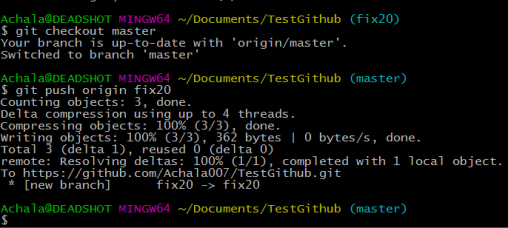
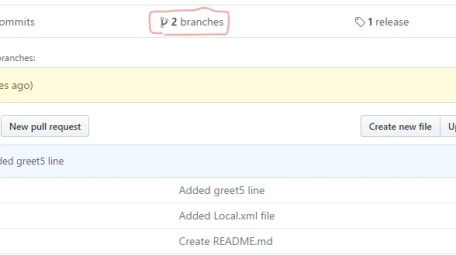
Now we can jump over to github and see that it’s there as 2 branches,
If you want to see your branches type,
git branch
If you want to see the merged branches type,
git branch –merged
If you want to see the un-merged branches type,
git branch –no-merged
You can also show all the branches as well as the last commits by typing,
git branch -v
git merge fix20

Now if you go back to the Vim and check whether the change has been done.
Now if you type in,
git branch
You can see the fix is still there, but since we merged it we don’t have to keep it. So let’s delete it
git branch -d fix20
In some situation you will want to delete un-merged branches type,
git branch -D fix20
If you want to delete the branch on GitHub type,
git push origin :fix20
If you go in to the Github you will only see only 1 branch.
Now I’m going to cover multiple branches and more specifically what I’m going to do is merge conflicts just so we can see how to resolve them. Type,
git checkout -b ‘fix25’ -> this is going to create a branch
vim Hello.xml
Then change some random comment like before (I added a comment ‘fix 22’) and,
git commit -a -m ‘Added a fix22 comment’
git checkout master – Go back to the master
Let’s create a new branch,
git checkout -b ‘HotFix’
vim Hello.xml
then change some random comment like before (I added a comment ‘hotfix’) then,
git commit -a -m ‘Added a hot fix comment’
git checkout master – Go back to the master
git merge Hotfix
Here there will be no problem because we only changed one file. So now let’s cause some problems.
git branch -d HotFix -> delete the hotfix
git checkout fix25
git checkout master
git merge fix25 -> we are going to get some errors
This is because there is a different version of Hello.xml and what we have here is cause due to multiple different branches. It will say a merge conflict.
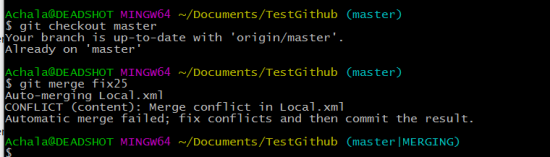
Let’s see how to solve this,
One thing we can do is delete this branch since we made a change some where else, basically made exactly the same change. However since it’s not merged type D. (Another way to resolve is to use what is call a merge tool)
git branch -D fix25

After this type,
git branch – we can see the conflict is resolved
What happens when you are left behind, this means numerous other commits have been committed and meanwhile you are back on a previous commit with your branch. Basically that is going to be solved by what is called rebasing. What it does is it just moves the branch to a new master or base commit. You should never rebase commits that have been pushed to a public repository.
Let’s get back on to the terminal,
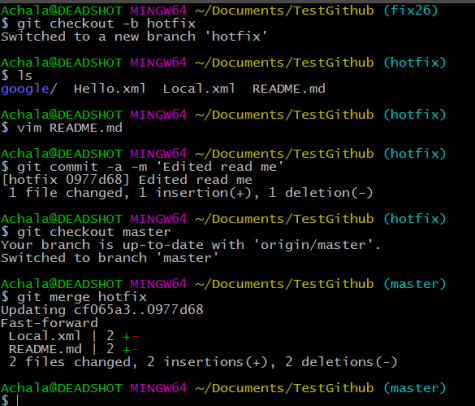
git checkout -b fix26
vim local.xml -> I changed a random comment
git commit -a -m ‘Changed the comment’
git checkout -b Hotfix
vim README.md -> I change a random comment
git commit -a -m ‘Edited read me’
git checkout master
git merge Hotfix
git branch -d hotfix
git checkout fix26
And now just understand that the README has been changed inside of the commit. However the fix26 is bin to the previous commit. If we go to Vim you’ll find that there is no hot fix comment.
So if we want to get the README from the current commit and save it inside here what we are going to do is rebase. And to do that type,
git rebase master
Then go to Vim you”l find the hot fix is there. So we were able to go and move our branch which is the fix26 over to the current commit.
That is basically how rebasing works.
Sometimes you want to eliminate a previous commit, but you still want to keep the commit for integrity reasons. Revert undoes changes made in that commit and makes a new commit. Reset actually deletes the commit which can cause problems.
git commit -m ‘Made a change that I will undo’
git revert HEAD -> You are back to where you started, but the commit was made
git reset someFile -> Removes a file from the staging area, but leave the working directory unchanged
Clean removes un-tracked files from your directory and is un-doable.
git clean -n -> Shows which files will be removed
git clean -f -> Remove un-tracked files
This concludes the GITHUB and Chill series ! And there are lot more stuff on Github like SSH keys, Work and Pull Workflow and more.
Hope I made sense in to you guys on Commonly and frequently used commands come across when working with Github. If you have anything to be clarified you can drop a comment or contact me. Thank You !

Clearly Explained ! Thumbs Up !
LikeLike
Good read !
LikeLike
It’s really useful! 👌 keep it up! 👏
LikeLike
Good work done ✌✌
LikeLike
Awesome!!!
LikeLike
Good work broo..well done…. keep it up
LikeLike
Very good work
LikeLike