
Hello there, how’d you like to learn more about Angular JS? So welcome to the part 2 of the Angular JS series. In this section, I will be talking about,
- Using multiple views
- Using multiple controllers
- 2-way binding
- Events
- More new directives
So let’s see how to use multiple views and multiple controllers. I have created 2 new files as angularTutorial2.html and exam2.js.
Now if you want to create multiple different views using the same controller this is how we would do it.

I have created a ng-controller as ‘ctrl1’which generates some random numbers. And add a expression to it. Using the same controller I have defined another view as well.
Then in the exam2.js file inside the app2 controller “‘m going to define both of those. So in this situation we have one controller and 2 views.


Now let’s take a look at how to use multiple different controllers. So go to the Javascript file and define a new controller. This time I will define the controller to generate random names. I will name the controller as ‘namesCtrl’. Then I have created an array of names. And then I have generated random names. Then similarly I have defined another controller to generate some random adjectives. So we have the names and the adjectives in two separate controllers.

Then go back to the html file to make this work. (Create 2 different controllers ad ‘nameCtrl’ and ‘adjCtrl’). So in this situation we have used multiple controllers.


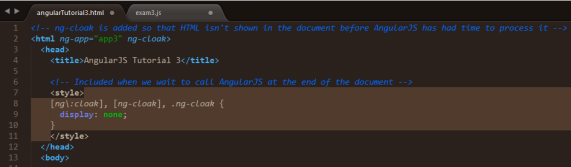
So you may notice that when we keep reloading the page there will be curly brackets popping up for a fraction of a second before we get the results. To remove them you can use ‘ng-cloack’ inside the html tag. And if you have your reference to Angular JS near the bottom section (as in mine) you would also have to define ng-clock in the style tag. It basically says that we don’t want things to be displayed on the screen until everything has been properly compiled and ready to be displayed.
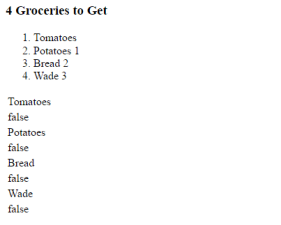
So that’s how ng-cloak works. Now let’s do another simple exercise with Angular JS, so that you will have the complete sense of the basics regarding this. I’m creating a new html and Javascript file. And inside the Javascript file I’m throwing some data into the controller for us to able to use.

Then go back to the html file. And inside a div tag define a controller referencing the one in the js file (gListCtrl). And like I showed you previously that you will be able to bind data using either expressions or ng-bind. Here I’m going to use expressions, but you can go either way. If you want to use ng-bind the code is,
<h3 class=”ListTitle”>
<span ng-bind=”groceries.length”></span> Groceries to Get</h3>
Then I’m going to create a list of the grocery items. Now I’m going to use ng-repeat to list the rest of the items (Start from two to skip the first item). The ng-if is used to skip the first item in the grocery.

You can also use ng-repeat-start or ng-repeat-end to allow yourself to use ng-repeat on 2 elements rather than just using one element. To structure those I’m going to create a table.

Now I’m going to show you 2-way binding to allow the users to come in and change the data models. Here I’m using ng-model to bind with the first grocery item. So when I change the grocery item the first grocery item in the list will be change momentarily.


Another cool directive that I will use next is ‘ng-switch’, which is going to allow us to conditionally insert or move an element inside of our document.


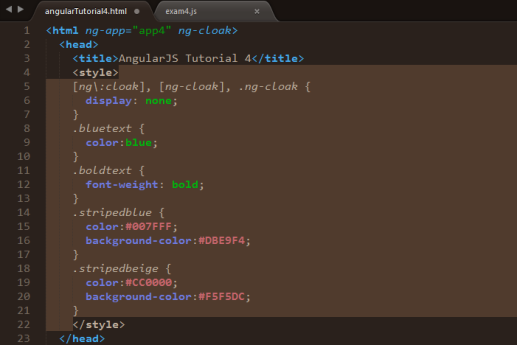
Now I’m going to talk about Events. So I have created angularTutorial4.html and exam4.js files and in the html file I have added some more stylings.
Then inside the controller A.K.A ‘eventCtrl’ create an input box and to start off I’m going to target the ng-blur event which would occur any time when the user would go inside of a input box and leave. Then underneath it I’m going to display an increment blur events on the screen. Then jump over to the javascript file, and inside of the scope object give a blur a default value of zero. And when you run it you will see that when clicked inside of the input box and left the blur events gets incremented by one.


So I will add all the events to one input box so that you will have a basic idea on what events are. And also just like the previous one inside of the scope object give a blur a default value of zero except for the key down event. What happens there is when ever the user presses a key on the keybord it will pass over an event to my javascript file and I’m going to handle in the js file in order to display what key was specifically clicked on. Here the function will convert the key code that passed over in to basic characters and numbers.
So that’s it for today. Hope I made some sense in to you on these interesting stuff. I hope to continue doing some more exercises and to discuss more on Angular JS in the next posts.
If you have anything to be clarified you can drop a comment or contact me. Thank You !

Very well explained Achala… Waiting for more interesting stuff✌
LikeLike
Well explained therefore easier to understand! Well done!
LikeLike
Well explained.. Good job!!
LikeLike
Very well written achala!! Keep it up
LikeLike
Good work mchn! Do a getting started with Node.js tutorial too!
LikeLike
Weldone! 👏 nice explanation!
LikeLike
Nice explanation..! Keep it up..
LikeLike
Very important explanation…
LikeLike